The mount I received from Celestron was overly tight in both DEC (declination) and RA (right ascension).

2. At the back end of the RA axis you will likely have white plastic cover that slips on the RA circles area. Remove it.


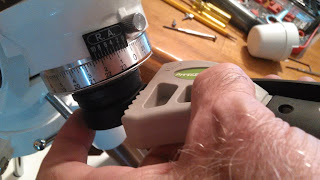
3. You likely find three finger screws on the black portion. Remove them. And if you have a polar scope, remove it at this time. (Screws were removed for this photo)
 4. Now we enter a fork in the road. If you have one of these rubber strap tools (Harbor Freight

 ...it just may be that you will be able to strap it on to the black portion
AND HOLDING the counterweight shaft FIRMLY,
TWIST the black portion COUNTER-clockwise and the entire part including the dial attached to it should be able to unscrew from the housing.

5. Loosen the RA dial knob and remove the upper RA dial cylinder.


7. Now comes the hard part: This disk is what holds the RA axis in place AND is where you adjust the tension on the RA axis. To turn this you MIGHT be able to use two nails or Allen wrenchs to twist the disk (if it is loose enough) OR you will need to construct a tool like I had to (because mine was WAY TOO tight).
The holes are 1 9/16" apart.
I took a small piece of 2x4, and near the end of it drilled two holes just sufficient to tap in
two nails whose points would fit into those indents. (Personally, I drilled a little deeper into
the disk, taking care NOT to drill too deep or to leave metal fragments in the housing).


Then I inserted the nails into the holes (notice that there is a black pipe with threads that you will have to adjust the depth of the nails to clear).
8. Now loosen and remove the back RA latitude adjustment "screw". This will allow your mount to be parallel to the floor making attaching your tool and the adjustment to the RA tightness easier.


NOTE: It will NOT take very much to change the tension! Be careful not to overdo it !


Test the looseness/tightness of the mount by swinging the counter-weight shaft back and forth.
(As mine was really tight it took several attempts to twist it and in the end even when I didn't
think I had done anything, there was a sufficient looseness that made me happy)
10. Now LOCK the RA lock knob. It is time to adjust the tension on the RA lock knob.


The problem with a tight mount is that you cannot properly balance the OTA (optical telescope assembly aka the telescope) and the result is that it places too much torque on the RA motor (for example) and will make it harder for the motor to track properly the motion of the stars across the night sky.
Finding precious little into on the web, I decided to put together a step-by-step instructional blog post to help my fellow astronomers who are having either a tightness problem or a looseness problem.
WARNING: You will likely VOID your warranty with Celestron if you attempt this fix. Just saying...
As for me, there is precious little to worry about. But proceed at your own risk.
***** First of all, remove the telescope from the mount so that you will not have it swinging around and potentially damaging both it and the mount needlessly.
The following instructions are for loosening or tightening the RA portion of the mount.
(DEC adjustments will be found HERE)
1. Tighten both the DEC knob and the RA knob and REMOVE all the counterweights but one (preferably leaving the lightest one on the long rod)
WARNING: if you have the Celestron motor kit already attached to the mount
be sure to disconnect the RA gears from the motor (see your instruction manual)
just to be on the safe side.
If you do not do this you could ruin your RA motor while making this
adjustment.
2. At the back end of the RA axis you will likely have white plastic cover that slips on the RA circles area. Remove it.


3. You likely find three finger screws on the black portion. Remove them. And if you have a polar scope, remove it at this time. (Screws were removed for this photo)


 ...it just may be that you will be able to strap it on to the black portion
AND HOLDING the counterweight shaft FIRMLY,
TWIST the black portion COUNTER-clockwise and the entire part including the dial attached to it should be able to unscrew from the housing.
If however you don't have one of these tools... GET ONE !
You could use a wrench or pliers but you risk really scratching it up (or worse!)
Your choice, your risk !
Remove the black housing:

5. Loosen the RA dial knob and remove the upper RA dial cylinder.


6. This will expose a metal disk that has two indentations on it:

The holes are 1 9/16" apart.
I took a small piece of 2x4, and near the end of it drilled two holes just sufficient to tap in
two nails whose points would fit into those indents. (Personally, I drilled a little deeper into
the disk, taking care NOT to drill too deep or to leave metal fragments in the housing).


Then I inserted the nails into the holes (notice that there is a black pipe with threads that you will have to adjust the depth of the nails to clear).
8. Now loosen and remove the back RA latitude adjustment "screw". This will allow your mount to be parallel to the floor making attaching your tool and the adjustment to the RA tightness easier.

Lower the head until it is parallel to the floor.

9. RELEASE the RA lock knob AND HOLD the counterweight still with your free hand and attempt to twist the disk with your homemade tool to tighten (clockwise) or loosen (counter-clockwise) the disk.
NOTE: It will NOT take very much to change the tension! Be careful not to overdo it !


Test the looseness/tightness of the mount by swinging the counter-weight shaft back and forth.
(As mine was really tight it took several attempts to twist it and in the end even when I didn't
think I had done anything, there was a sufficient looseness that made me happy)
10. Now LOCK the RA lock knob. It is time to adjust the tension on the RA lock knob.

Using a Phillips screwdriver, remove the screw and knob. This will expose a square bolt.

At this point you may want to adjust the grip on the RA axis with this bolt. Using a 1/2" wrench, loosen the bolt a little (if it is overly tight) or tighten it (if your RA lock knob wasn't tight enough to hold the telescope in position.) Again, it will not take much to change the tension.

11. Reposition the RA black knob so that it is in a good position to loosen and tighten the RA then replace the Phillips screw.
12. Now slide the RA circle back in and lock it with the thumb screw

13. Screw the black housing for the polar scope back into the rear end of the mount.

Note: If you have a polar scope, now replace it in the black housing as per its instructions.
14. Replace the thumb screws that hold the polar scope in place
15. Replace the white housing cover

16. Now reassemble the mount and telescope as per normal including the counter-weights, RA motor shaft, OTA etc as needed... (see its instructions if necessary)
No comments:
Post a Comment