Monday, October 28, 2019

A Galaxy and a Comet !

M 33 The Pinwheel Galaxy
Celestron 6i scope
Focal reducer and Canon T3i unmodded camera
Struggled with frost on the scope's optics
ISO 3200
8 images, each 6 minutes long, stacked in GIMP
Total integration: 48 minutes
Processed and cropped in GIMP and Luminar 2018

Captured a very small dim Comet C/2018 N2 in Andromeda
Celestron 6i scope on a Celestron AVX mount
Canon T3i unmodded camera
ISO 3200
7 subs at 180 sec each
Stacked with GIMP for total of 21 minutes integration
Post processed with Luminar 2018 and GIMP
Cropped heavily!

Monday, October 14, 2019

The Stars of Cr 399 (aka Brocchi's Cluster)

Cr 399 aka Brocchi's Cluster (an "open" visual cluster)

As per my previous post, I thought I would have a little artistic fun by putting what I call my "StarCross" screen over the objective lens of a refractor. Since I was imaging under a FULL Moon it was difficult to capture the many stars and dark patches of the Milky Way in which this loose cluster of stars are located. I hope to try this again when the Moon is not hindering.

No, stars do not have "crosses". These are only caused by a screen or vanes located somewhere in the optical train of a telescope. My screen is just a piece of scrap chicken wire that has square openings about 1/2 inch in size (not the hexagonal or octagonal type.)

A little history and info on Cr 399:

Brocchi's Cluster (also known as Collinder 399, Cr 399 or Al Sufi's Cluster) is a random grouping of stars located in the constellation Vulpecula near the border with Sagitta. The members of the star cluster form an asterism which has given rise to its name as the Coathanger.

Ok, I will invert the image above and you will see why it has the name "Coathanger"...

History:
It was first described by the Persian astronomer Al Sufi in his Book of Fixed Stars in 964. In the 17th century, it was independently rediscovered by the Italian astronomer G. B. Hodierna. In the 1920s, Dalmero Francis Brocchi, an amateur astronomer and chart maker for the American Association of Variable Star Observers (AAVSO), created a map of this object for use in calibrating photometers. In 1931, Swedish astronomer Per Collinder listed it in his catalogue of open clusters.

Star Chart Location (in the lower right hand corner - in yellow:


The Facts:
The status of this group as a star cluster has changed in recent years. The group was considered to be a cluster for most of the 20th century. Looking at a variety of criteria, however, a study in 1970 concluded that only 6 of the brightest stars formed an actual cluster. Several independent studies since 1998 have now determined that this object is not a true cluster at all, but rather just a chance alignment of stars. These recent studies have generally based their findings on improved measurements of parallax and proper motion provided by the Hipparcos satellite which were first published in 1997.

Observing it:
The asterism is made up of 10 stars ranging from 5th to 7th magnitude which form the conspicuous "coathanger", a straight line of 6 stars with a "hook" of 4 stars on the south side. An additional 30 or so fainter stars are sometimes considered to be associated as well.
Under a dark sky, the Coathanger can be seen with the naked eye as an unresolved patch of light; binoculars or a telescope at very low power are usually needed in order to view the "coathanger" asterism. It is best found by slowly sweeping across the Milky Way along an imaginary line from the bright star Altair toward the even brighter star Vega. About one third of the way toward Vega, the Coathanger should be spotted easily against a darker region of the Milky Way. 

Star-crossed under a Full Moon !

Sometimes I wishing my star pics were more appealing with the effect of light crosses, but my refractor scope doesn't produce them.

No problem!


A trick of photography can gave me images with a more "artistic" feel by simply adding a metal screen over such a telescope. I used a metal screen with 1/2 square openings and placed it over the objective lens (after framing and focusing).

The result is that the bright stars will have those star-crosses while not ruining any nebulosity.

By the way, this image was created under a FULL MOON last night! Enjoy!

Data: 80mm refractor (480mm focal length)
Canon T3i body unmodded
400 ISO  at f/5.6
2 frames stacked with DeepSkyStacker = 4 minutes
Post processed with Luminar 2018
Cropped 50%

Friday, October 11, 2019

Getting Rid of Some Chromatic Aberration In Astrophotography

M 32 with lots of Chromatic Aberration
(that's the excessive blue/purple stars)

There are basically two kinds of refractor telescopes: achromatic and apochromatic.
Achromatic refractor telescopes are far cheaper than apochromatic ones due to their design and the kind of glass used in the main lens (objective). The apochromatic will render faithful colors and no excessive blue/purple glows around stars... but at what a price! 

Unless the achromatic telescope (the cheaper design) has a long focal length (f/10+) the result will be that the various colors of light from a pinpoint source (a star) will focus at different distances from the lens as you can see in this illustration. 

In this case, you can see in the illustration below that the blue wavelength of light focuses closer than the green or read. The result is called chromatic aberration, where an excessive amount of blue/purple light around, for my purposes, an otherwise "white" star.

Here is the same photo cropped to the upper left hand quarter at 100%:
The color blueish/purple around the bright stars is not only quite objectionable they are false colors as well.

So, how can one get rid of it?

There is a program called "darktable" could help a lot! And it is FREE !
(Yes, they titled it with a lower case "d" !)

First of all, astrophotographers know that you must take the images in the RAW mode, not jpg.
"darktable" can access the RAW image and allow you to make fine adjustments to the image.

"Defringing" is one of the keys here.

It is not easy to find with this program but it is under the "Correction" group (right hand side of the program).

Zoom in on an offending star and then select the "defringe".
Next select the operation mode "static threshold (fast)"
Then move the "edge detection radius" all the way to the right.
Next move the "threshold" slider all the way to the right.

Here's the comparison of before and after (100% mag of that upper left hand corner):
                                          Before...                                         ...after
Much better!

Now save the RAW modified image by the keyboard shortcut "control + e".
You will find the adjusted image in a folder called "darktable_exported" with a TIFF file.

About Aprochromatic Design: The Star of Refractor Telescopes

The apochromatic design and lens is designed to bring all the colors to the same point on a digital camera sensor, hence chromatic aberration is history... but at what price? An aprchromat designed refractor can be 3x to 10x greater in cost for the same focal length.


Thursday, October 10, 2019

Under a Moon lite night sky: M 33 The Triangulum Galaxy


Taking images under an increasingly bright Moon last night (nearing Full Moon status) I took my chances and imaged M 33 aka the Triangulum Galaxy with my Celestron 6 ota, this time using an autoguider (worked really well!) with a Canon T3i at prime focus. 26 - one minute images, stacked with DeepSkyStacker, ISO 6400 = about 26 minutes total. I should have taken some flats but it was already late and getting below 23*F ! Did some post-processing on it with Luminar 2018 and some cropping in (to minimize vignetting).

Monday, October 7, 2019

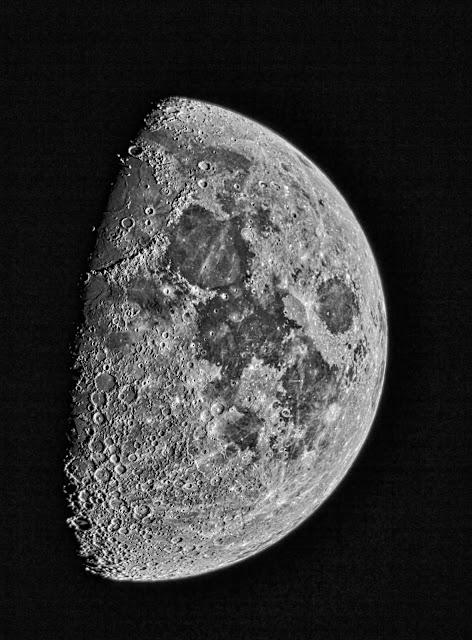
Post First Quarter Moon in HDR

As promised in the prior post, here is the Moon, just past what they call "First Quarter".
Now, perhaps you are wondering why they don't call it "Half Moon" because it appears that way to an observer here on Earth. Well, it is a matter of perspective. When the Moon is in this lighting it has completed 1/4th (one quarter) of its orbit around the Earth.

Anyway, I took about seven images of the Moon with my Celestron C6 telescope (without a focal reducer) and a Canon T3i camera body attached to it. Each image I changed the exposure time to capture details that a single exposure would either make too dark or too light to show finer details.


As you can see, an individual image just doesn't capture the wide range of detail and contrast.
That is why we will use a program (and there are many out there) to produce a HDR or high dynamic range photo.
I used HDRtist (a Mac app) to combine the images into one HDR, which I then rotated to the right to give it its proper viewing angle. (Note: this is in color due to atmospheric issues that night)

But because we know the the Moon is not made out of cheese (and the Earth is round, not flat!) I desaturated the image to make it gray scale instead of color:

Finally with some post-processing with Luminar 2018, working with contrast and sharpening, etc. here is the result:


One more:   Earth's Moon is normally seen in subtle shades of grey or yellow. But small color differences can be greatly exaggerated to make the small differences more apparent. The familiar Sea of Tranquility (Mare Tranquillitatis) is the blue area right of center.

Though exaggerated, the different colors are recognized to correspond to real differences in the chemical makeup of the lunar surface - blue hues reveal titanium rich areas while orange and purple colors show regions relatively poor in titanium and iron. Calibrated by rock samples from the Apollo missions, similar multicolor images from spacecraft have been used to explore the Moon's global surface composition.

M 27 under a First Quarter Moon

Well, it has been a while since I last posted, mostly due to cloudy skies and rain. But last night I used my Celestron NexStar 6i scope to image the Moon which is now past "First Quarter" (I will post it later).

But typically I don't image dim deep sky objects (galaxies, nebula, etc) because of the bright moonlit sky. But just for the fun of it I slewed the scope to M 27, aka the Dumbbell Nebula. In my enthusiasm I did not connect the autoguide scope so I was only able to get 10 second exposures without star smearing. Using 6400 iso on my Canon T3i camera I took a single image...dark, almost nothing there (as I expected).


The second shot below is the same shot but merely lightened... UUGGH!  Lots of grain and you can barely see the nebula...


However, in the desire to have some fun I started taking 118 of these 10 second shot (yes, that is a lot of pics!) and gave it a go using DeepSkyStacker to integrate them. The result... ok, the graininess is gone but nothing to write home about yet...


But now for the "magic" of post-processing to bring out detail and color that you can't see easily!
After post-processing with Luminar 2018... WOW! Who would have thought! Here is a "before and after" post-processing screen capture:


Now for the BIG REVEAL:

M 27  aka The Dumbbell Nebula

WOW! Total integration time: just under 20 minutes of overall exposure time, some time with post-processing and, well, there it is!

By the way, this was taken with an unmodified stock Canon T3i. There is a lot more red available but I would need to use a modified camera without the standard infrared filter. Maybe later...

Lesson:
So, even if you can only get short exposures with astrophotography due to the limitations of the light of the Moon, poor guiding, etc... go ahead, get A LOT OF THEM and you just might be surprised by what you get after post-processing the final image!