Monday, May 15, 2017

Adjusting DEC Tension (tightness/looseness) on a Celestron OMNI XLT CG-4 German Equatorial Mount (GEM)

The mount I received from Celestron was overly tight in both DEC (declination) and RA (right ascension).

The problem with a tight mount is that you cannot properly balance the OTA (optical telescope assembly aka the telescope) and the result is that it places too much torque on the RA motor (for example) and will make it harder for the motor to track properly the motion of the stars across the night sky.

Finding precious little into on the web, I decided to put together a step-by-step instructional blog post to help my fellow astronomers who are having either a tightness problem or a looseness problem.

WARNING: You will likely VOID your warranty with Celestron if you attempt this fix. Just saying...
As for me, there is precious little to worry about. But proceed at your own risk.

*****First of all, remove the telescope from the mount so that you will not have it swinging around and potentially damaging both it and the mount needlessly.

The following instructions are for loosening or tightening the DEC portion of the mount.
(RA adjustments can be found HERE)

1. Tighten both the DEC knob and the RA knob and REMOVE all the counterweights but one (preferably leaving the lightest one on the long rod)
         WARNING: if you have the Celestron motor kit already attached to the mount
                      be sure to disconnect the DEC gears from the motor (see your instruction manual)
                      If you do not do this you will likely ruin your DEC motor while making this
                      adjustment. It may be possible to loosen the slip clutch but better careful than sorry.

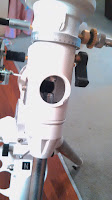
2. Remove the black plastic cover on the mount (see pics below)


3. Locate the nut in the center of the portion of the mount that holds the OTA (telescope)
You will be loosening/tightening the DEC axis with this nut with a 5/8" socket wrench
AND...

4. Locate the nut inside the DEC housing...
 
where you will use another 5/8" wrench to HOLD this nut while you loosen/tighten the other nut on top with the socket wrench.
Note: if you cannot get the 5/8" wrench inside the housing, then remove the counterweight
still attached and loosen or remove the counterweight bar until you can get the wrench inside
to hold that nut.

6. Loosen the DEC axis lock knob. Test the present tension by swinging the counterweight carefully to see if it is too tight or too loose.

7. Looking down on the top nut 
....* turning it clock-wise will tighten the DEC axis
....* turning it counter-clockwise will loosen the DEC axis

WARNING: It will not take much to affect the tension on the DEC axis! You do not want it to be too loose!

8. When you are satisfied, replace the black cap, tighten the DEC axis lock knob, add the counterweight(s) you believe will help balance the scope in the DEC.

9. Add your OTA.

10. CAREFULLY loosen the DEC locking knob slowly and adjust the position of the counterweight until the telescope is balanced (see your instruction manual).

IF you need to adjust the tension on the RA axis see this blog post.

Monday, May 8, 2017

First Light (on the Moon) with the CATE project equipment

Last Saturday I picked up most of the equipment for the C.A.T.E. project and received great training from our Oregon coordinator. Due to the fact that the solar filters had not yet arrived we were unable to practice on the Sun. However the training was necessary and it was good to put "hands on" all the rest of the equipment and still practice with it.
Last evening while the Sun was still up I set up the equipment in the backyard and did a little practice on the nearly full Moon.
The program they provided that will be used for the total eclipse of the Sun does not allow me to adjust exposures for high dynamic range photography (HDR) and though it takes 8 exposures in a set for HDR purposes only the least exposed image of  was useful:


It was very under-exposed but with a little post-processing I was able to get this image:

Due to the fact that this image was taken in BROAD DAYLIGHT I was quite pleased with the result.
By the way, the Moon was only about 35 degrees above the eastern horizon and the Sun was still up in the west. Under this kind of lighting the result is always a low contrast image.

Still, I thought I could draw our a little more contrast. So I went to work on it and came up with this:

The original image was taken with a Point Grey camera that is only produces a black and white image but is 5 megapixel, which I think would take a common DSLR color camera at 15 megapixels to produce due to the fact that it take 4 pixels to produce a single color.

I will write up more about the scope, mount, camera, etc in a later post.

Sunday, April 23, 2017

Meade Focal Reducer Tests

I purchased and just received a Meade f/6.3 focal reducer/field flattener for my Meade LX200GPS 8" telescope.

The purpose of this optic (which is mounted between the telescope and the camera/eyepiece) is to provide a wider field of view which is much brighter than without. The telescope is build at f/10, which is quite dim, but that is made up in the fact that it gathers a lot of light because the mirror collector is 8 inched in diameter.
However, for astrophotography purposes, f/10 makes for longer exposures compared to a f/6.3 optic setup... in other words, the time of exposure is reduce by almost 40%. For example, if (without the focal reducer) it took 10 minutes to create an acceptable image of a galaxy, then with the focal reducer that time would be shortened to just over 6 minutes.
The disadvantage is that the field of view is much wider, thus making the object (in this case some galaxy) appear nearly 40% smaller than without the focal reducer. So it is a trade-off: either a short exposure (which is desirable) or a more magnified view.

In my tests, I took an image without the focal reducer. Here is the setup:
DSLR + T ring + camera adapter + telescope
And here is the "base line image":

Then I inserted the Meade Focal Reducer:
DSLR + T ring + camera adapter + Focal Reducer + Telescope 
And the resulting image:

Then I inserted the electric focuser for the telescope:
DSLR + T ring + camera adapter + electric focuser + focal reducer + telescope
And the result:

I was surprised to find that by adding more distance AFTER the focal reducer in this manner that the field of view increased and the exposure time was also shorter... and a bonus, it appears that there was less vignetting!

Again, here are the resulting images:
No focal reducer
Focal reducer with                      Focal reducer with
minimum distance                       maximum distance

Thursday, April 6, 2017

What celestial objects will be visible during the August 2017 Solar Eclipse?

Using a freeware star program called Stellarium, I was able to set the time and date to the Great American Solar Eclipse (August 21, 2017) and removing the "atmosphere" found out that there will be at least three planets visible (Mercury, Mars, and Venus) and as a bonus, the Orion constellation and the Orion Nebula should be visible as well !  Here is a screen capture (click on the link below the photo it to get a larger view)


Here is a close up of the area around the Sun at that time: (Note the bright star of Regulus is just to the left of the Sun/Moon)

Saturday, April 1, 2017

Comparison of the Celestron C5 telephoto and the Bushnell Northstar 90mm telescope

As I look forward to the solar eclipse in August, 2017 which passes through central Oregon I have been wondering how each scope's view will make the eclipse appear. 

Having just purchased an old school Celestron C5 (previous blog entry) 


and the Moon being visible last night, I mounted it and my Bushnell Northstar 90mm telescope


on tripods and using the same camera (Canon t3i) at prime focus I imaged the Moon for comparison shots. Here are the results:

                           Bushnell Northstar 90mm                             Celestron C5

Not only does the Celestron C5 have a wider view but the exposure difference was significant.

At ISO 100 the Bushnell required 1/5 sec exposure due to the fact that it is a f/14 lens
whereas the Celestron C5 only needed 1/20 sec because it is an f/6 lens.

That means that under low light the C5 will be easier to focus and can use a shorter exposure time than the Bushnell. However, the Bushnell gives a closer view of the subject, nearly twice the magnification of the C5.

Conclusion: 

As there is no such thing as a telescope that can be "all things to all people" it appears that, if possible, I will use both scopes during totality (if I have sufficient help from others).

The Bushnell might work well for a closer view of any prominences that may appear on the edges of the Sun during the eclipse and for imaging the Baily's Beads.

The red around the edges are prominences
and Baily's Beads (on the right hand side)
result from the Sun peeking through the
mountain peaks of the Moon during a solar eclipse.

The Celestron C5 will capture more of the surrounding corona due to a larger field of view. The fact that the corona is so dim will also play to the C5's ability to let more light come to the sensor in a shorter period of time.


Thursday, March 30, 2017

Comet 41P/Tuttle-Giacobini-Kresak

With windy and clear skies (a first for many moons) I was able to capture Comet 41P/Tuttle-Giacobini-Kresak just west of the "Big Dipper" aka Ursa Major ("The Great Bear") constellation.
This was taken with a Canon t3i and is made up of five -30 sec exposures at f/5.6 and 250mm telephoto - ISO 3200 stacked with DeepSkyStacker Live. No tail is visible though larger telescope can image a slight one.


Wednesday, March 29, 2017

"New" scopes waiting for clear skies!

When the skies aren't clear my eyes go to craigslist to see if anyone has a scope I can't live without. And today I found another!

I picked up an old school Celestron C 5 telephoto 750mm f/6 (black version) for $90 off craigslist today. The previous owner has chased solar eclipses all over the world! Jealous!

I had to clean the backside of the front plate (no problem, it seemed to have gotten 'smokey'). 

Works great... now just have to get a mounting plate and a couple of rings and it is good to go for the eclipse in August!