Friday, December 13, 2019

Total Solar Eclipse with the Citizen CATE Project UPDATE !

I have always wanted to do more than look at celestial objects and image them. To help do some actual science was a hope I thought was beyond me.

But then, just over two years ago I participated in the Citizen CATE Project with the National Solar Observatory under the direction of Matt Penn (principle investigator) to image the Total Solar Eclipse of 2017.
The goal was to provide data on this rare occurrence to investigate the inner corona of the Sun (which is only visible from planet Earth during a total solar eclipse).
You can find my blog report here.

This was taken during the total eclipse
with a 250mm telephoto on a Canon T3i DSLR.

Just today (December 13, 2019) Matt Penn released to the public the final findings of this project.
You can find the report here.

THREE points of interest in this report:

1. You will notice that myself and my wife are listed (at the beginning of the report) as two of the many "authors" who participated in the CATE project! Nice!

In this report the goal of the project is laid out in the "Introduction" (worth reading!)

2. Under the heading "3. CATE Volunteer Network" you will find on the line "cate17-005" the site that we observed and imaged from! We were about 4 miles north of Mitchell, Oregon, hence the site is called "Fossil, Oregon" though it was really close to where the Twickenham Road crosses the John Day River.
You will also notice that line is in bold type, which is explained at the end of that section this way:
"Note. The six sites used in the present analysis of the CME outflow are shown in bold text. Sites with cloudy conditions or instrumental difficulty are shown in italics."
Our site is in bold type, in other words, our data was only one of six that were useful for this project! WooHoo! SCIENCE was possible!

3. Under the heading of "6.2. Spatial Filtering and Velocity Measurement" you will find a set of images used as an "example" of the applied filters needed to gain real science.
The site "cate17-005"... that MY site! WOW! Unexpected!

Science was done! Something on my bucket list has just been crossed off!

Monday, November 25, 2019

Meade LX200GPS Mount communication issues SOLVED!

To do quality astrophotography with a Meade LX200GPS telescope (by the way, mine is the 8" model) you need to be able to use a computer program star chard, a guiding camera/scope and guiding software. You will be able to take LONGER exposures and image dimmer objects in the beautiful night sky.

However, if you have a Meade LX200 GPS telescope and want to be able to use the star chart program Cartes du Ciel AND the autoguiding software program, PHD2, you may have encountered issues with both programs trying to work together to control the telescope mount. Either one will connect or the other... but both? Good luck... especially if you are using a powered USB hub at the scope mount and another USB cable that transfers the info to your computer/laptop.

I was nearly going to defork the scope and put it on another mount... when I stumbled on to the solution... AGAIN !  It seems old age is catching up with me as TWO previous posts show: May 5, 2019 and May 11, 2019. I figured this out BEFORE! LOL!  Why the problem? Months of non-use and accidental disconnecting one of the key solutions to the problem.

All the same, if YOU are having this problem (not the memory one) THERE IS HOPE to get your scope up and running with a guide scope!

The issue is that the Meade hardware/software/driver will only allow one COM connection via a USB to RS232. Most of us use a device like this one:
It is a USB-A to Serial DB9 RS232 Adapter Cable (this one is 3 ft. long) and is know as a Keyspan (available through Amazon on this page).

with this cable (usually supplied with the telescope, or something like it):


The "phone cable connector" looking end is connected to the telescope mount here:


Here is the "fix" and solution to my problem:

You will notice, however that there are TWO RS232 ports on the telescope mount... and for good reason!

At least for me, I have to have TWO of these "Keyspan" USB to Serial DB9 RS232 adapters.

Each one is connected to the mount via the two RS232 ports and both are connected either to the computer (via the USB cable) or through a powered USB hub
Notice that BOTH RS232 ports now have an occupant!

The result is that one program will grab one Keyspan and the other can grab the other!
Occasionally I have to start the PHD2 program first, connect up with it AND then open up the star chart program and connect with the telescope with it. One might have to select which COM port the second program needs but that is no big problem to solve.

And... walla! You can control the telescope mount with the star chart program, Cartes du Ciel and have PHD2 do the fine guiding for long exposure imaging!

Hope it works for you!


Monday, November 11, 2019

The 2019 Transit of Mercury

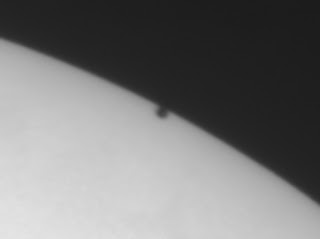
Though the weather was mostly uncooperative (heavy fog and some clouds to boot) I was able to grab a few images of the transit of Mercury. A transit of the planet Mercury is when the planet moves between us and the Sun, making Mercury look like a black dot on the visible disk of the Sun.

I participated in a nation-wide effort called "The Citizen ToM Project" (ToM=Transit of Mercury) under the direction of Zach Stockbridge. Youtube

The goal was to recreate the experiment proposed by Edmond Halley (the great comet was named after him). He calculated that two people widely spaced on our planet timing the transit of Venus would be able to use basic geometry and calculus to figure out how far the Earth is from the Sun (the "AU" or astronomical unit). He died before he could prove it. After his death, several expeditions were launched (in 1761) to gather the data needed to determine the AU with good success.

My experience that day for the Citizen ToM Project:
The day of the transit started with heavy fog forcing me to travel about 45 miles from my home in La Pine, Oregon into the Oregon Outback. My final location was Fort Rock State Park, Oregon. I had intended to travel even more south-east to avoid the fog but that direction had even thicker fog. 

In my rush to set up the equipment in the hopes of making an early observation (using the Citizen CATE total solar eclipse project equipment) I forgot to polar align! But no need... I got lucky: my guess-timate was almost dead on! As the Sun would only peak out very occasionally (and even then it was through thinner fog) I found that I only had to barely move the scope as the Sun was always in the camera's field of view! 

I missed most of the early timings but was able to catch the egress of Mercury! Then... nothing but thick clouds over the Sun! It was awesome to have participated in this transit of Mercury experiment! - Richard Lighthill, La Pine, Oregon.


This is image is the first that I was able to make when the fog thinned enough for me to focus clearly:
If you look closely a little up and left of center you will see the dot that is Mercury.

Here is where I was located for these photographs: Fort Rock State Park:

Hours later I was able to catch Mercury
before it egressed from the Sun's disk.
(It is in the upper right quadrant of the Sun.)

Here the planet as it begins to leave the Sun's disk (cropped image)


And then it is gone!

Next time: November 13, 2032!

Saturday, November 9, 2019

Clear skies and more practice on imaging the Moon


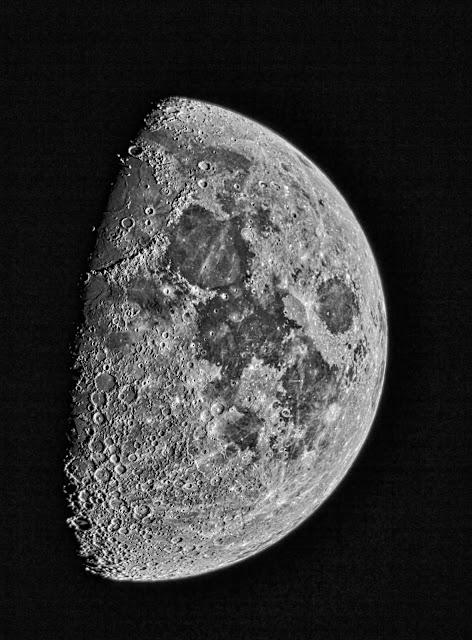
The skies cleared up well last night so I was able to practice some more Moon imaging...
November 8, 2019
LX200GPS 8" prime focus
PointGrey Grasshopper mono camera
UV/IR and medium red filter
Sharpcap
AutoStakkert!3
Post processing with GIMP


Monday, November 4, 2019

The Moon is Bright so I didn't want to Fight it................. so I IMAGED it !

A few of my first efforts at lunar photography with AutoStakkert 3.
Seeing was bad, had to keep the percentage around 15% of the best frames.
Meade 8" LX200GPS
PointGrey Grasshopper mono camera
Prime focus
AutoStakkert 3
GIMP post processing


A Galaxy and a Bunch of Nebula

M 33 Triangulum Galaxy
6 frames@ 360sec Total time: 36min  ISO 3200
Stacked sith DeepSkyStacker 4.2.2
Post Processed in Luminar 2018
Celestron 6 w/focal reducer
Canon T3i unmodded camera— from La Pine, Oregon.


 NGC 7000 - The North American Nebula (west coast side!)
3 frames@ 320 sec each  Total time: 16 min ISO 3200
w/ Canon T3i unmodded camera
Stacked with DeepSkyStacker 4.2.2
Post Processed in Luminar 2018
Celestron 6 SCT w/focal reducer
AVX mount — from La Pine, Oregon.


 NGC 6960 Western Veil Nebula
6 frames@ 240 sec each  ISO 3200 Total time: 24 min
Canon T3i unmodded camera
Stacked with DeepSkyStacker 4.2.2
Cropped Post Processed in Luminar 2018
Celestron 6 SCT w/focal reducer
AVX mount — from La Pine, Oregon.


NGC 6995 Eastern Veil Nebula
7 frames@ 240 sec each @ ISO 3200  Total time: 28 min
with Canon T3i unmodded camera
Stacked with DeepSkyStacker 4.2.2
Post Processed in Luminar 2018
Celestron 6 SCT w/focal reducer
AVX mount — from La Pine, Oregon.


IC 405 Flaming Star Nebula
4 frames @ 360 sec each @ ISO 3200 Total time: 24 min
Stacked with DeepSkyStacker 4.2.2
with Canon T3i unmodded camera
Cropped & Post Processed in Luminar 2018
Celestron 6 SCT w/focal reducer
AVX mount — from La Pine, Oregon.


M 76 Little Dumbbell Nebula
5 frames@ 360 sec each @ ISO 3200 Total time: 30 min
Stacked with DeepSkyStacker 4.2.2
Canon T3i unmodded camera
Cropped close and post-processed with Luminar 2018
Celestron 6 SCT w/focal reducer
AVX mount — from La Pine, Oregon.

All these were taken on October 29 & 30, 2019.

Friday, November 1, 2019

A Tiny Sunspot! First sunspot in 28 days!


I was alerted this morning by http://spaceweather.com/ that this tiny sunspot had broken the 28 day drought of sunspots. Since I am participating in the Citizen ToM Project (Transit of Mercury) I broke out the necessary equipment and took some short videos (20 sec) while the Sun was still less than 30 degrees above the horizon this morning, November 1, 2019 at 9:28 am PDT here in La Pine, Oregon.

The Citizen ToM Project is being featured on Sky and Telescope's website. Go here for more information: https://www.skyandtelescope.com/astronomy-news/citizen-tom-mercury-transit/

Normally sunspots are numbered but this one is so new and it is so uncertain how long it will last that they had not yet given it a number yet.

Here is a negative view of the same image which makes the sunspot white:


Here is a full Sun image of it. It is in the lower middle left side...
Yes, it is hard to spot!

Here is the Solar Ham website image of the same showing the locality of the sunspot:

And Solar Ham's close up of the sunspot area:

When I processed the initial image with GIMP and the Sobel filter the sunspot really popped out!


My images taken with:
Daystar 480mm scope
Lunt Solar Wedge
PointGrey Grasshopper camera 
Celestron CG-5 mount
Captured in SharpCap
Stacked with AutoStakkert
Post processed with Irfanview 
Taken at 9:28 am PDT La Pine, Oregon, USA 


Monday, October 28, 2019

A Galaxy and a Comet !

M 33 The Pinwheel Galaxy
Celestron 6i scope
Focal reducer and Canon T3i unmodded camera
Struggled with frost on the scope's optics
ISO 3200
8 images, each 6 minutes long, stacked in GIMP
Total integration: 48 minutes
Processed and cropped in GIMP and Luminar 2018

Captured a very small dim Comet C/2018 N2 in Andromeda
Celestron 6i scope on a Celestron AVX mount
Canon T3i unmodded camera
ISO 3200
7 subs at 180 sec each
Stacked with GIMP for total of 21 minutes integration
Post processed with Luminar 2018 and GIMP
Cropped heavily!

Monday, October 14, 2019

The Stars of Cr 399 (aka Brocchi's Cluster)

Cr 399 aka Brocchi's Cluster (an "open" visual cluster)

As per my previous post, I thought I would have a little artistic fun by putting what I call my "StarCross" screen over the objective lens of a refractor. Since I was imaging under a FULL Moon it was difficult to capture the many stars and dark patches of the Milky Way in which this loose cluster of stars are located. I hope to try this again when the Moon is not hindering.

No, stars do not have "crosses". These are only caused by a screen or vanes located somewhere in the optical train of a telescope. My screen is just a piece of scrap chicken wire that has square openings about 1/2 inch in size (not the hexagonal or octagonal type.)

A little history and info on Cr 399:

Brocchi's Cluster (also known as Collinder 399, Cr 399 or Al Sufi's Cluster) is a random grouping of stars located in the constellation Vulpecula near the border with Sagitta. The members of the star cluster form an asterism which has given rise to its name as the Coathanger.

Ok, I will invert the image above and you will see why it has the name "Coathanger"...

History:
It was first described by the Persian astronomer Al Sufi in his Book of Fixed Stars in 964. In the 17th century, it was independently rediscovered by the Italian astronomer G. B. Hodierna. In the 1920s, Dalmero Francis Brocchi, an amateur astronomer and chart maker for the American Association of Variable Star Observers (AAVSO), created a map of this object for use in calibrating photometers. In 1931, Swedish astronomer Per Collinder listed it in his catalogue of open clusters.

Star Chart Location (in the lower right hand corner - in yellow:


The Facts:
The status of this group as a star cluster has changed in recent years. The group was considered to be a cluster for most of the 20th century. Looking at a variety of criteria, however, a study in 1970 concluded that only 6 of the brightest stars formed an actual cluster. Several independent studies since 1998 have now determined that this object is not a true cluster at all, but rather just a chance alignment of stars. These recent studies have generally based their findings on improved measurements of parallax and proper motion provided by the Hipparcos satellite which were first published in 1997.

Observing it:
The asterism is made up of 10 stars ranging from 5th to 7th magnitude which form the conspicuous "coathanger", a straight line of 6 stars with a "hook" of 4 stars on the south side. An additional 30 or so fainter stars are sometimes considered to be associated as well.
Under a dark sky, the Coathanger can be seen with the naked eye as an unresolved patch of light; binoculars or a telescope at very low power are usually needed in order to view the "coathanger" asterism. It is best found by slowly sweeping across the Milky Way along an imaginary line from the bright star Altair toward the even brighter star Vega. About one third of the way toward Vega, the Coathanger should be spotted easily against a darker region of the Milky Way. 

Star-crossed under a Full Moon !

Sometimes I wishing my star pics were more appealing with the effect of light crosses, but my refractor scope doesn't produce them.

No problem!


A trick of photography can gave me images with a more "artistic" feel by simply adding a metal screen over such a telescope. I used a metal screen with 1/2 square openings and placed it over the objective lens (after framing and focusing).

The result is that the bright stars will have those star-crosses while not ruining any nebulosity.

By the way, this image was created under a FULL MOON last night! Enjoy!

Data: 80mm refractor (480mm focal length)
Canon T3i body unmodded
400 ISO  at f/5.6
2 frames stacked with DeepSkyStacker = 4 minutes
Post processed with Luminar 2018
Cropped 50%

Friday, October 11, 2019

Getting Rid of Some Chromatic Aberration In Astrophotography

M 32 with lots of Chromatic Aberration
(that's the excessive blue/purple stars)

There are basically two kinds of refractor telescopes: achromatic and apochromatic.
Achromatic refractor telescopes are far cheaper than apochromatic ones due to their design and the kind of glass used in the main lens (objective). The apochromatic will render faithful colors and no excessive blue/purple glows around stars... but at what a price! 

Unless the achromatic telescope (the cheaper design) has a long focal length (f/10+) the result will be that the various colors of light from a pinpoint source (a star) will focus at different distances from the lens as you can see in this illustration. 

In this case, you can see in the illustration below that the blue wavelength of light focuses closer than the green or read. The result is called chromatic aberration, where an excessive amount of blue/purple light around, for my purposes, an otherwise "white" star.

Here is the same photo cropped to the upper left hand quarter at 100%:
The color blueish/purple around the bright stars is not only quite objectionable they are false colors as well.

So, how can one get rid of it?

There is a program called "darktable" could help a lot! And it is FREE !
(Yes, they titled it with a lower case "d" !)

First of all, astrophotographers know that you must take the images in the RAW mode, not jpg.
"darktable" can access the RAW image and allow you to make fine adjustments to the image.

"Defringing" is one of the keys here.

It is not easy to find with this program but it is under the "Correction" group (right hand side of the program).

Zoom in on an offending star and then select the "defringe".
Next select the operation mode "static threshold (fast)"
Then move the "edge detection radius" all the way to the right.
Next move the "threshold" slider all the way to the right.

Here's the comparison of before and after (100% mag of that upper left hand corner):
                                          Before...                                         ...after
Much better!

Now save the RAW modified image by the keyboard shortcut "control + e".
You will find the adjusted image in a folder called "darktable_exported" with a TIFF file.

About Aprochromatic Design: The Star of Refractor Telescopes

The apochromatic design and lens is designed to bring all the colors to the same point on a digital camera sensor, hence chromatic aberration is history... but at what price? An aprchromat designed refractor can be 3x to 10x greater in cost for the same focal length.


Thursday, October 10, 2019

Under a Moon lite night sky: M 33 The Triangulum Galaxy


Taking images under an increasingly bright Moon last night (nearing Full Moon status) I took my chances and imaged M 33 aka the Triangulum Galaxy with my Celestron 6 ota, this time using an autoguider (worked really well!) with a Canon T3i at prime focus. 26 - one minute images, stacked with DeepSkyStacker, ISO 6400 = about 26 minutes total. I should have taken some flats but it was already late and getting below 23*F ! Did some post-processing on it with Luminar 2018 and some cropping in (to minimize vignetting).

Monday, October 7, 2019

Post First Quarter Moon in HDR

As promised in the prior post, here is the Moon, just past what they call "First Quarter".
Now, perhaps you are wondering why they don't call it "Half Moon" because it appears that way to an observer here on Earth. Well, it is a matter of perspective. When the Moon is in this lighting it has completed 1/4th (one quarter) of its orbit around the Earth.

Anyway, I took about seven images of the Moon with my Celestron C6 telescope (without a focal reducer) and a Canon T3i camera body attached to it. Each image I changed the exposure time to capture details that a single exposure would either make too dark or too light to show finer details.


As you can see, an individual image just doesn't capture the wide range of detail and contrast.
That is why we will use a program (and there are many out there) to produce a HDR or high dynamic range photo.
I used HDRtist (a Mac app) to combine the images into one HDR, which I then rotated to the right to give it its proper viewing angle. (Note: this is in color due to atmospheric issues that night)

But because we know the the Moon is not made out of cheese (and the Earth is round, not flat!) I desaturated the image to make it gray scale instead of color:

Finally with some post-processing with Luminar 2018, working with contrast and sharpening, etc. here is the result:


One more:   Earth's Moon is normally seen in subtle shades of grey or yellow. But small color differences can be greatly exaggerated to make the small differences more apparent. The familiar Sea of Tranquility (Mare Tranquillitatis) is the blue area right of center.

Though exaggerated, the different colors are recognized to correspond to real differences in the chemical makeup of the lunar surface - blue hues reveal titanium rich areas while orange and purple colors show regions relatively poor in titanium and iron. Calibrated by rock samples from the Apollo missions, similar multicolor images from spacecraft have been used to explore the Moon's global surface composition.