Sunday, December 31, 2017

Tonight's New Years Eve (nearly) Full Moon!


Though there was thin cloud cover creating a bit of a bright haze around the Moon I decided to give it a try. Not much else to image tonight as clouds are increasing...

Tonight's New Years Eve (nearly) Full Moon
Canon T3i - ISO 400 - 50 sec
Bushnell North Star Schmidt-Cassegrain 90mm 1,200mm f/13 scope
Tripod mounted

Post processed to enhance contrast and sharpness

Friday, December 29, 2017

Updated Report by the CATE Solar Experiment I was part of


During the 2017 fall meeting press conference of the American Astrogeophysical Union, Matt Penn, the lead scientist for the CATE project (of which I was a part of) for the 2017 Total Solar Eclipse, gave a short updated report on where the data is and a little on the history leading up to this project.
The image above is one of the latest images (enhanced) which will be complied into a video that might last up to 82 minutes, of the inner corona of the Sun during totality.

Follow this link to hear his brief report on Youtube:

I am very happy to have been part of this amazing scientific research project!

Celestron Sky Scout: The Bad News and the Good News UPDATE!

IMPORTANT: Be sure to read my DECEMBER 29, 2019 update review at the bottom of this post
regarding the GPS ROLL-OVER OF April 6, 2019 that affected GPS worldwide.


I went to a thrift shop today and found a Celestron Sky Scout Personal Planetarium device. It was BRAND NEW in the box, never had been used! I had seen these expensive devices in astronomy mags for year (well, prior to 2015, that is) but the price... OUTRAGEOUS for something that had no magnification, like a telescope or binocular might give. But...


...finding on a 50% off sale (whoohoo!) I got it for $17.50 and hurried home to give it a go!

I popped in two AA batteries, powered it up outside and waited for the GPS in it to "fix" on a sufficient amount of GPS satellites... and waited and waited... "Can't fix"!!!!!

Ok, maybe it needs an update?

I install the CD-ROM software, hit "Update Software" and it downloaded the software update (that is, for the computer, NOT the device). I connected the device via the supplied USB cable and... "Cannot find" the device... AAARGH. It turns out that in Windows 10 a lot of legacy stuff does not work because "This program will not work on a 64 bit Windows"...

Ok, I could put out an old XP laptop and try it but... I "googled" Celestron Sky Scout and found many other frustrated owners (old and new) whose device was almost a brick... no way to update the firmware for the device to manually set the date past 2015 !!!! And Celestron just stopped production and support for it! And most people could not get the device to get a GPS fix before the device gave up.

That is the BAD news.

BUT, I have GOOD NEWS (sort of)!

One post on CloudyNights seemed to have found a solution (sort of) to the GPS fix problem.
And it goes like this:

"When you startup and try to acquire a GPS signal, don't wait for it to time out.  Once it acquires two satellites, hit "Back" and then select "retry acquiring a GPS fix..." again.
When you see the progress bar, hit the "GPS" button to expand the screen to include a list of satellites, relative strength of signal and acquisition status (i.e. black is "locked on satellite") >
Do this each time it acquires a new satellite and after three attempts it'll lock on fairly quickly (about 30 seconds for me).  You should end up with 3-5 satellites in a short time."

So I popped outside and gave it another go, using this suggestion and... YAY! GOOD NEWS!
It worked!

Sort of... in that for all celestial objects that do not move it did fine.
But for object that move like the Sun, Moon, planets, etc  it will not be able to properly identify them or their positions past the year 2015 (This post is December, 2017).

But, hey, at least it isn't a total loss!

December 30, 2017 UPDATE:
What can you still do with a Sky Scout?

* You can listen / read the info on all the objects in its data base

* You can listen / read the entire "Field Guide" section of the data base and learn about basic
     astronomy (lots of lessons there!)

* You can hook an amplified speaker to the headphone jack so that everyone can hear the info

* If you can get the GPS to get a fix you can still use it
       * to identify / locate all interstellar objects in its data base
       * and attach it to a dobsonian telescope and use its 'locate' feature as a finder scope
       * to determine your GPS location so you can input the info into a non-GPS "goto" scope
       * to discover the UTC time

UPDATE on December 29, 2019: Since April 6, 2019 the world had to "re-fixed" the GPS positioning to account for the magnetic shifts taking place gradually on our planet. As a result, this device may not be as accurate as it was prior to that date. Even telescopes with "go-to" ability are struggling with this issue. However, given the fact that this device is not "telephoto" it may give fairly accurate info anyway.

Hope this helps someone either NOT to purchase one or at least give it a second life for identifying all other celestial objects!

Thursday, December 28, 2017

Clear skies and a quickie image of the Moon


Bullialdus is a lunar impact crater located in the western part of the Mare Nubium. To the north by north-west is the broken-rimmed and lava-flooded crater Lubiniezky, north-northeast of Bullialdus is Gould, nearly east-southeast of Bullialdus is Wolf, and south-west of Bullialdus lies the smaller crater König.
Bullialdus is 61 km in diameter and is named after Ismaël Bullialdus, a famous astronomer and mathematician during the seventeenth century. An early defender of the ideas of Copernicus, Kepler and Galileo, Ismael Bullialdus is known today as "the most noted astronomer of his generation."
(Source: https://en.wikipedia.org/wiki/Isma%C3%ABl_Bullialdus)

Wednesday, December 27, 2017

DYI Scope and Lens Dew Heaters

Because it is either frosty cold or heavy dew at night it is always likely that frost or dew will build up on the front element of a telescope making it useless.
So it is necessary to lightly heat the scope or lens just enough to keep the frost/dew from developing.
The main controller (12 volts) can run up to 4 heating strips, each one independently controlled.
I purchased this one from Thousand Oaks through Amazon for $113   (https://www.amazon.com/gp/product/B0033UKAFO)


Then I ordered the dew heater from DewNot for my 8" Meade LX200GPS scope through Amazon for $55.00 (ouch!)  https://www.amazon.com/Dew-Not-Heater-Strip-DN009/dp/B003V36ZMK

They work great... but the heating strips are a bit expensive...
...so I discovered that it is possible to make one at home more inexpensively!

I purchased some Nichrome wire (https://www.amazon.com/Dew-Not-Heater-Strip-DN009/dp/B003V36ZMK) for $6.49


I grabbed some ordinary duct tape, a ruler, an old RCA audio cable, scissors, solder & soldering iron and got to work...


First I measured the diameter of the scope or lens using a cord to determine the approximate circumference, in this case I was making one for my 55-250mm Canon zoom lens and I used the RCA cable...

 Pulling out some duct tape I measured the needed area for the heating wire...


Next I laid out the nichrome (heating wire) on the sticky side of the tape. Since the area I need to heat is very small I will be putting the wire on 1/3 of the tape and then folding the tape over in thirds. I left plenty of wire available for needed connecting to the RCA cable.
December 30, 2017 UPDATE: the less wire you use the HOTTER and more quickly it will get hot... and that is not always a good thing! I used too little wire in this test and when I added the power it got hot, really hot! But I was able to turn down the rheostat to keep it from overheating. So it may be better to use more and then turn up the rheostat than to have it too hot at the lowest setting. This may require you to create another heat strip... but at the cost of redoing it, it is a no-brainer.


I spliced the RCA cable to expose the wires...

added some solder to them, wrapped them around the wires and soldered them in place (as best I could)

Then the "wrap up"...


Then finally adding some velcro strips to wrap and hold the heater in place...

I tested this on the heating controller and learned that I had to set it on the lowest temp setting to give the proper amount of heat without it over heating the wire and tape (test yours carefully!)

Here is the final product wrapped around the lens:


Obviously the cable is short but I will be using a RCA video extension cable when the camera is piggybacked on a scope or attached to a tripod.

The Good News: First, it just works and secondly, I can make as many as I want for nearly nothing! 

Tuesday, December 19, 2017

My DYI Piggy-Back Camera Mount for NexStar 4SE

One reason why I bought myself a Celestron NexStar 4SE was so that I could use it for astrophotography, especially to have the scope mount guide a DSLR camera for wide-field to short telephoto astro-imaging.

I had purchased a Vixen-style bar mount for my DSLR cameras (Canon) to put in place of the OTA (the telescope itself), like this one:
But it did have the disadvantage of not being able to easily set up the GOTO since the scope would be off the mount. Then I would have to hope that the mount and tripod did not move in the process of demounting/mounting the scope a very real problem that would throw off the GOTO alignment.

I checked online to see if there was a ready-made piggy-back camera mount for the NexStar 4SE but they were a bit expensive for such a simple device... one costs from $40 to $90, like these:
   

So checking around in my "bits and pieces" box (filled with old telescope parts that I have hung on to just for situations like this) I found a telescope "split-ring" mount but it was too big in diameter for the 4SE.  Having purchased a drill and tapping bit, I simply created the necessary four holes & threads in the ring at 90 degree intervals to accept adjusting bolts with a button nut on the end of it (to protect the barrel of the scope).
    

The split-ring already had a place where I could put in a threaded camera bold and a piece of rubber (glued) that would hold the DSLR camera in place.
  

Attaching it to the scope was simply a matter of unscrewing the split ring and removing the ring from the barrel.


One advantage of this setup also is that it places the camera nearer to the center of gravity on the scope. Also the scope's mounting bar can be slide forward or backward to aid in balancing the overall setup.


Another advantage is that I can rotate the split-ring to keep the camera from blocking the red-dot finder scope.
Mounting in this way also allows one to view through the eyepiece at the back of the scope in the normal way or add a webcam to the back port of the scope.

Though it works just fine I plan do some post-modifications:
* Remove the screws and add thick rubber padding inside the rings so that the threaded screws are not necessary
* Cut the split-ring tightening screw down so that the (brown) washers are not necessary.
* And paint the rings Celestron orange or black to match the scope.

Thursday, December 14, 2017

A Geminid Meteor Captured Near Orion's Belt and Sword

(Click on the image for a more full-screen view)

A Geminid Meteor
...part of the annual Geminid Meteor Shower
caused by Earth crossing the trail of the object 3200 Phaethon,
which is thought to be a Palladian asteroid with a "rock comet" orbit.

Field of view:
just east of the Belt and Sword of the Orion constellation
The bright nebula is Messier 42 (aka The Great Orion Nebula)

Setup:
Canon T3i, 50mm lens, ISO 1600, 6 second exposure at f/2.8
December 14, 2017 @ 1:21 am - Outside Temp: 15 degrees F

Post-processing:
Pushed the saturation up a bit
otherwise the image is "as is"

History of the shot:
I woke at about 12:45 am and looked out the bedroom window and could see lots of stars. So quickly getting dressed warm I gathered up my Canon camera, 50mm lens and my tripod and headed out to my observatory & warm room (which wasn't all that warm since I didn't start the heater in it when I went to bed... dumb).
After setting the focus and choosing a short enough exposure time (so the stars would not trail too much), I proceeded to capture as many images of the area just east of the belt and sword of the constellation Orion... from the "comfort" of my "warm room" (a 4x6 foot shed next to the obs).
About 1:21 am I captured the one and only meteor (though I continued to "fish" in this portion of the "lake" of the sky until 2:00 am).
Here's a closeup (cropped) image of just the meteor. You will see its color and the color of the slightly streaking stars around it. Again, click on the image for a more full-screen view.


Monday, December 4, 2017

M 2 Globular Star Cluster before the Moon rose tonight

Messier 2

After a very clear and cold day I was eager to get into the observatory and do a little imaging.
However the star alignment with the Meade LX200GPS was off and I had take a good deal of time getting all the settings back in order again.
Finally was able to take a few images of Messier 2 (M 2) which is a globular star cluster in the southern sky. It is believed that there are around 150,000 stars in this cluster!
Still due to unsteady seeing I was only able to stack a few images (25 secs each) before the Moon began to fill the sky with its light.
This image (cropped) is just over 2 minutes of total exposure time at ISO 800, Canon 40D body, a focal reducer and daylight white balance setting.
Some post-processing with Luminar and Irfanview.
Enjoy!

Sunday, December 3, 2017

December 2017 "Super Moon"

Got up early Sunday morning and captured this image with my trusty old Bushnell scope and a Canon t3i DSLR.
A supermoon is a full moon (or a new moon) that approximately coincides with the closest distance that the Moon reaches to Earth in its elliptic orbit, resulting in a larger-than-usual apparent size of the lunar disk as seen from Earth. The technical name is the perigee syzygy of the Earth–Moon–Sun system. For more info:  https://en.wikipedia.org/wiki/Supermoon

My hope is to take some more full moon shots each month of 2018 and compare their relative sizes in a future post.


Click on the image for a better view!

Friday, November 10, 2017

Update on Supernova SN2014J

In 2014 I imaged my first supernova in another galaxy. It is the bright star the arrow is pointing to.


Here is my blog on that occasion: https://lapineobservatory.blogspot.com/2014/01/captured-my-first-supernova-tonight.html

The initial explosion was a supernova called SN 2014J, discovered on Jan. 21, 2014, in the nearby galaxy M82, located 11.4 million light-years away from Earth.

Here is a before/after image of it taken by an astronomer at University of London Observatory named Dr. Stephen J. Fossey (here's a report about it)


The Hubble Space Telescope now has also imaged that exploding star over a period of 2 years after its initial blast. The result is that you can see the shock wave of that explosion in the area around that supernova as it expands into the stellar dust and light of that galaxy.

Here is Space.com's report about it: https://www.space.com/38731-exploding-star-echo-of-light-hubble-telescope.html

This is the repeating image sequence that the Hubble captured. You can see a ring shockwave that distorts the region around it!


Monday, November 6, 2017

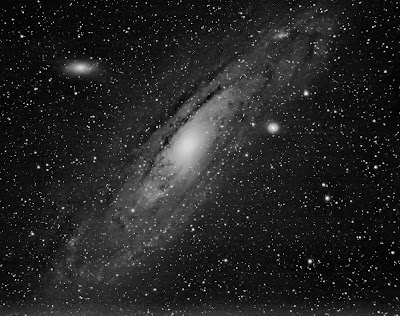
A break in the clouds and Andromeda Galaxy in Black and White

The skies cleared just long enough tonight to put in some imaging time before the Moon rose above the horizon. Outside temp: 20 degrees.
I captured the Andromeda Galaxy with the Daystar telescope (from the CATE Solar Experiment) and a Canon 40D camera.
This is the result of stacking 140+ images (ranging from 10 to 15 sec each) with DeepSkyStacker and then post processed using Luminar photo editing program. Total time: 30 minutes of exposure.
Click on image for a bigger image

Friday, October 27, 2017

First Deep Sky Imaging Test with CATE Experiment Scope and Mount

The weather last night was positively super so I set out to test the Daystar refractor scope that came with the CATE Experiment for some deep sky imaging. I used the same mount that we used in the 2017 solar eclipse experiment as well.

I really didn't think that the mount would perform as well as it did. But I was able to get up to 15 seconds of exposure occasionally before I encountered star streaking. That may have been more an issue of lack of polar alignment than the motors themselves, as well as the scope not being balanced all that well due to the additional weight of the Canon T3i that I used to capture the images below. I think I will have to put the Daystar scope on a longer mounting bar to achieve better balance.

And add to this the fact that the Moon was near 1st quarter and "polluting" the sky with its reflected light from the Sun. All the same, the weather couldn't have been more promising!

Since the mount is not a "go-to" mount I had to rely upon the age-old eyeball to put me in the ballpark of the objects I knew would be good tests for the setup.
All the images that follow were post-processed using Luminar (for Mac and PC, now).

First up was M 57, the Ring Nebula. Its that little greenish ball near the top center of the image. Granted, this was a challenge, to be sure for this setup but I was pleasantly surprised all the same! It is so very small that I wasn't even confident that it would be more than just a green-blue star, but there it is!
M 57, the Ring Nebula in Lyra

Next I headed over to the great globular cluster in Hercules, M 13. This was easy to image and it was much larger in diameter and easy to see!

Here is a cropped image of it:

Next, I headed over to the Dumbbell Nebula, M 27. Again, these are "stacked" images using DeepSkyStacker and post-processed to bring out more color and detail. Again I was quite well pleased that the scope and mount performed so well.

Here it is cropped in:


Now I went to the north-eastern sky and captured the Double Cluster in Perseus. This was a breeze to find and capture due to the large area of sky and the fact that I am just imaging stars.

Now it was on to the Andromeda Galaxy, M 31. This is a stack of 12 images at 10 second exposure times (total: 2 minutes) with the ISO set at 3200 on my Canon T3i camera. Very nice! I will be trying more of this in the future with many more images to stack! Should be beautiful!

Finally, I decided to try and capture a much dimmer galaxy, the Triangulum Galaxy, not far from Andromeda. This again was a stack of about 12 images, each for 15 seconds, with the ISO set to (12,800 (extreme!) With a lot of post processing of the final stack image this is what I got!

Camera running out of memory and desiring to see the results, I closed up shop and headed indoors!
Clear skies!